
I’ve always thought small electronics projects were cool — the challenge and elegance of creating a digital device that does one thing extremely well, composed of parts stripped down to the core needs, rather than building software in the common environment of general-purpose laptops and servers. I took some classes on this in college (I actually have a minor in Electrical & Computer Engineering), and occasionally thereafter built some small devices on platforms like Arduino or particle.io, but it had been a while since my last hack, and I was rusty.
Then I had an idea for a device I could use on a regular basis. It would combine two things I really liked — digital technology, and sailboat racing. The Raspberry Pi platform gives you a ton of power. The marine environment makes engineering quite complicated. This took a lot longer than expected (especially with a pandemic in the middle) but the result is really cool:
This story is about what I made, how I did it, and some things I learned in the process. The entirety is very long, so I’ve broken it up into separate chapters, one blog post each.
Marine electronics project — table of contents
- Project background
- The platform
- A digression on suppliers…
- The software
- Power and packaging
- Fabrication and assembly
- Mounting and installation (take one)
- Installation (take two) — Success!
Background: Sailing Fast Upwind
You can’t just point a sailboat any direction you want; sailing upwind requires zig-zagging diagonally across the wind field. How high into the wind you “point” is a tradeoff between sailing more directly at your goal and the absolute forward speed of the boat. For each boat, there’s an optimal angle to sail into the wind — the best tradeoff between power (speed) captured from the wind, and progress toward your upwind goal (“velocity made good” or VMG), as opposed to laterally.
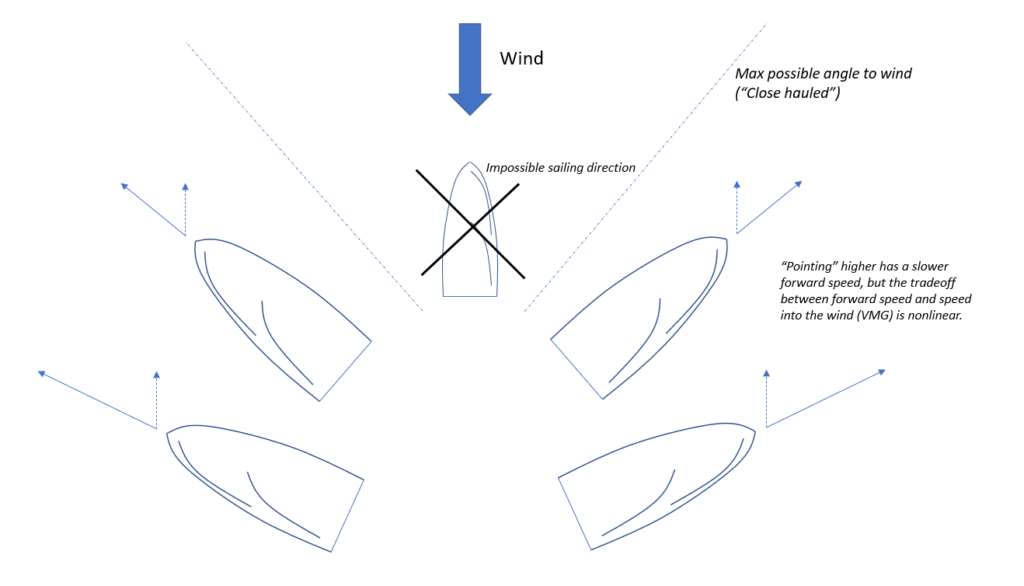
In mathematical terms, the VMG is the cosine of your forward velocity (boat speed) along your angle to the wind.
But it’s slightly more complicated than that — the optimal angle to sail is also a function of the wind speed you encounter. Depending on whether the weather is windier or calmer, you need to adjust and steer a bit differently.
There’s a service you can pay for that will run some calculations about the particulars of your sailboat — the make & model, as well as the sizes of the sails you carry, and they will send you a spreadsheet that displays something called the polars of your boat, as well as targets. This is done by physics modeling software called a Velocity Prediction Program, or VPP.
The Targets Table is simpler, so I’ll explain it first: For a few evenly spaced wind speeds, it tells you what angle into or away from the wind you should aim for, and how fast you should expect to be going, for optimal upwind or downwind sailing. You can print this out on a little card, laminate it, and refer to it while you’re trying to sail fast:
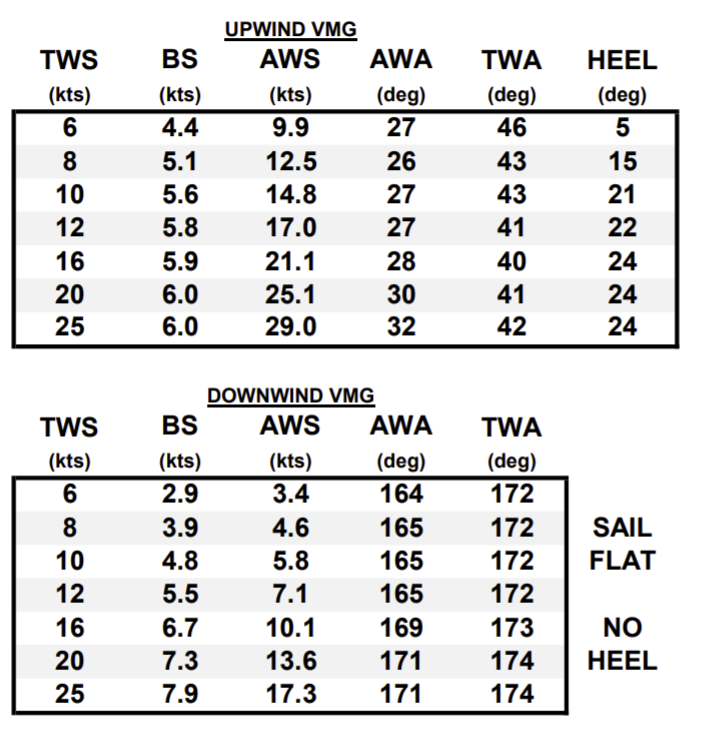
As you’re sailing you look at your instruments to note the true wind speed (TWS). Referring to that row, you can tell how fast your boat speed (BS) should be, as well as how high into the wind you should point (TWA or AWA if you’re referencing true or apparent wind angle respectively). Your first objective is to adjust your direction to point at the right TWA/AWA. Then if your forward speed is lower than the specified BS, adjust your sail trim until you get up to the right speed.
So as an example, in 12 knots of wind (1 knot = 1 nautical mile / hr ≈ 1.15 mph), you should be pointing at 41° off the true wind angle on one tack or the other; and if you’re doing everything right, the boat’s forward speed should max out at 5.8 kts. That will give you optimum VMG for those conditions.
If your goal is heading directly downwind, you refer to the lower table — instead of running directly 180 degrees off the wind, this table says you’ll actually get there fastest by zigzagging down at 172-174 degrees to either side.
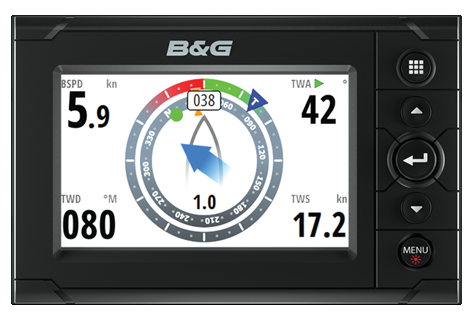
I’m not exactly very good at it, but I really enjoy racing my sailboat. I’m always trying to learn how to go a bit faster. Tools like this give me something specific to aim for, rather than just guessing if something “feels faster” (from a VMG perspective) or not. There are limitations though. For one thing, I have some electronic instruments for measuring wind speed/direction, and the boat’s speed and heading. But from those, you need to look at the wind instrument, do the lookup into a printed card, then glance back at the speedometer, and then figure out what to do.
The math isn’t hard but it is distracting, especially when you’re also trying to scrutinize your sails and keep an eye on the racecourse. And also, those tables work for a race course that is a direct upwind-downwind “racetrack” but sometimes race courses are shaped like triangles or diamonds and knowing the target speed for those other points of sail requires looking at a different (much larger) table (called the polars table) that would be too cumbersome to use by eye.
The Goal
Electronics manufacturers will sell you a fancier instruments package (like the B&G Hercules H5000) that can ingest the polars table and run the real time target calculations for you for any point of sail — but that costs thousands of dollars… display sold separately. (Are you kidding me?!) I wanted a better interface for performance calculations, and hopefully at much less cost. Most of the math to perform, after all, is fairly simple — just some basic trig like sines and cosines.
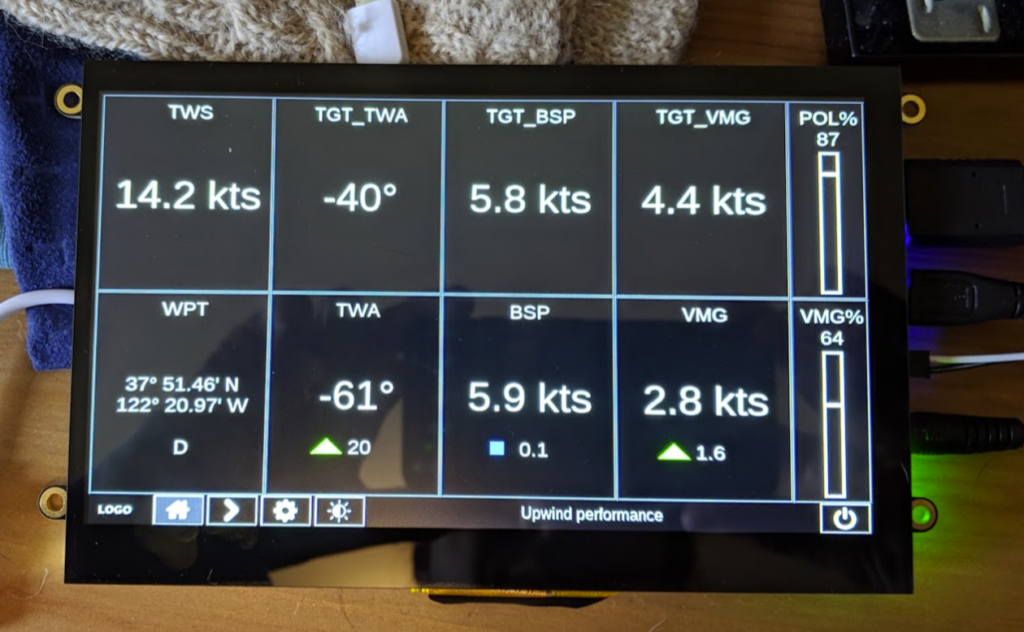
I figured I could build a device that shows me what I want. It should have a LCD display that would give me clear directions — “head up/down by X degrees, increase speed by Y tenths of a knot” that would reduce the cognitive attention load and let me focus more on the boat and the race, while still giving me the data I need as quickly and clearly as possible. It needs to talk to my existing marine instrument network. And it needs to be waterproof.
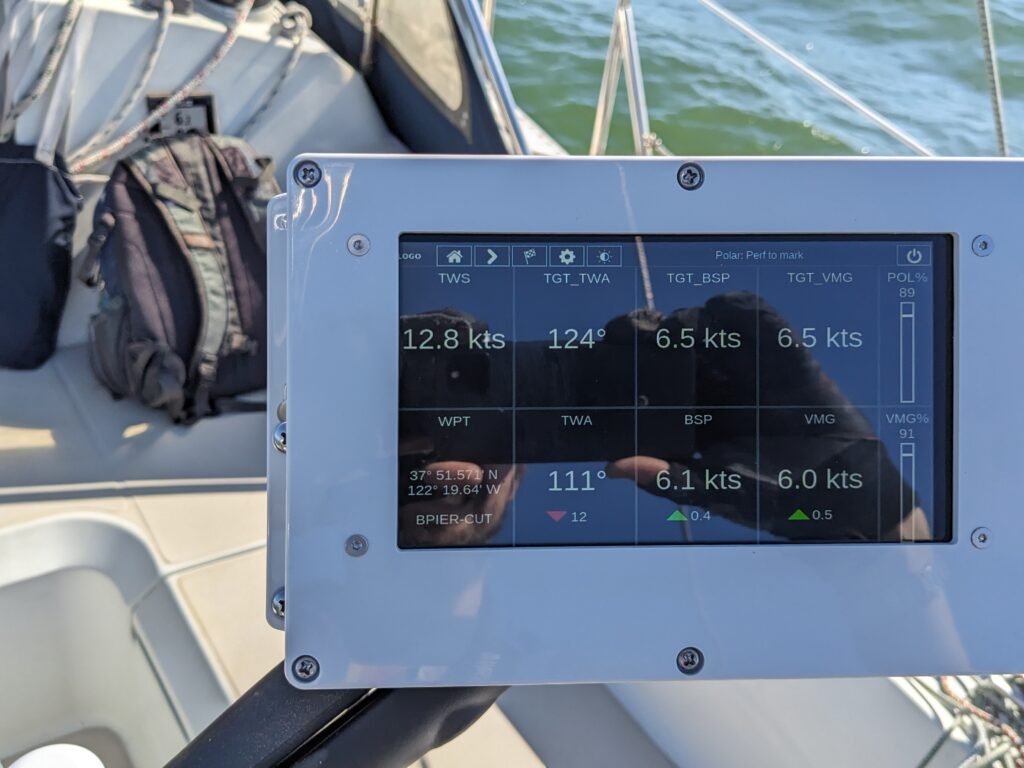
And, friends, it took three years of off-and-on work (and another year of procrastinating before I finally got it fully installed onboard), but I actually built it:
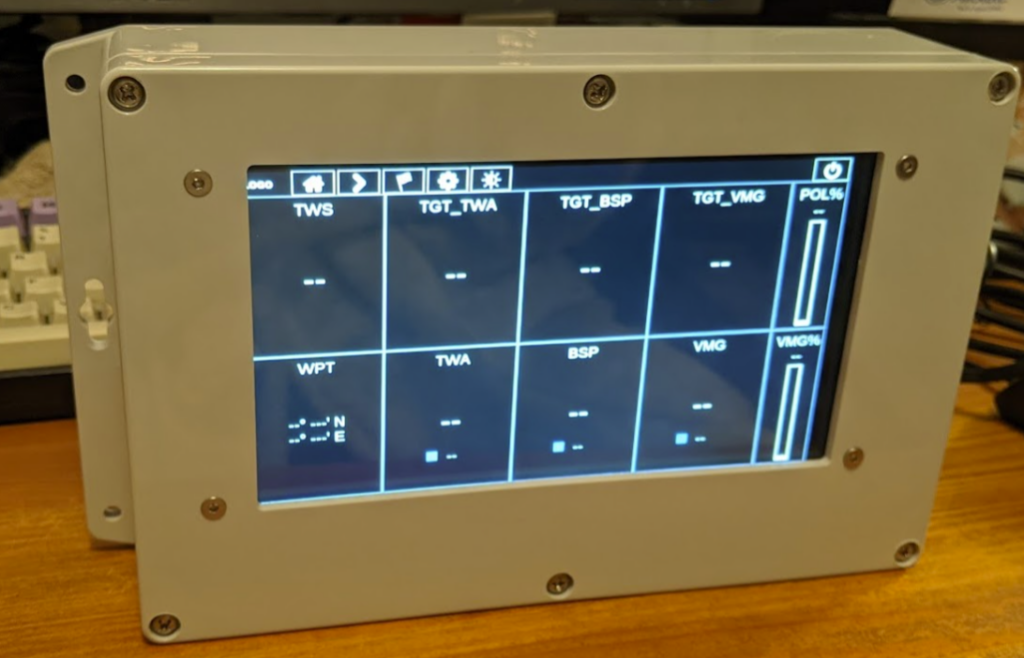
I learned a lot along the way, about marine data networks (NMEA2000), Raspberry Pi computing (which is awesome), electronics integration and electrical systems, 3d modeling, and even a thing or two about CNC machining. This has been a lot of fun. (It also is cheaper than buying an H5000, but in the end, it was also more expensive than I would have thought — and definitely took way longer to make than the shipping lead time for an existing device.) The rest of these blog posts share the details of how I built it (with some critical help from a few friends).
Links to each chapter will appear in the table of contents below as they are posted–stay tuned!
I’ve enjoyed your hardware posts.. now I fantasize about making a “new train in X minutes” sign to sit on my desk and in my living room
You should make it! That same impulse has crossed my mind, too.
You could probably put that together with an Arduino wifi breakout board + an HD44780-style character LCD.